
DITO Sim Registration
If you’re using a DITO SIM card in the Philippines, whether you’re a new or existing user, you need to register your SIM card. Under the SIM Registration Act (Republic Act No. 11934), it’s now mandatory for all mobile users in the country to register their SIM cards. If you don’t, your SIM might get deactivated — meaning no calls, texts, or internet!
This law aims to prevent scams, fraud, and other illegal activities by ensuring that all SIM cards are linked to a verified user. It’s all about making the mobile network safer and more secure for everyone.
Don’t worry if this seems confusing — we’ll guide you step by step in this article.
- How to register your DITO SIM card (step-by-step)
- What documents do you need
- Special instructions for foreigners and business users
- Also, how to claim your free bonus data after registering
Let’s get started and make sure your DITO SIM remains active and ready to use — hassle-free.
DITO SIM Registration Easy Methods
Registering your DITO SIM is a lot easier than you might think. Whether you just bought a new SIM or you’ve been using it for a while, DITO has made the whole registration process smooth and beginner-friendly. You can do it all online, without visiting any store.
DITO SIM Registration via App
The easiest way to register your DITO SIM is through the official DITO app. It’s user-friendly and only takes a few minutes.
Here’s how to do it:
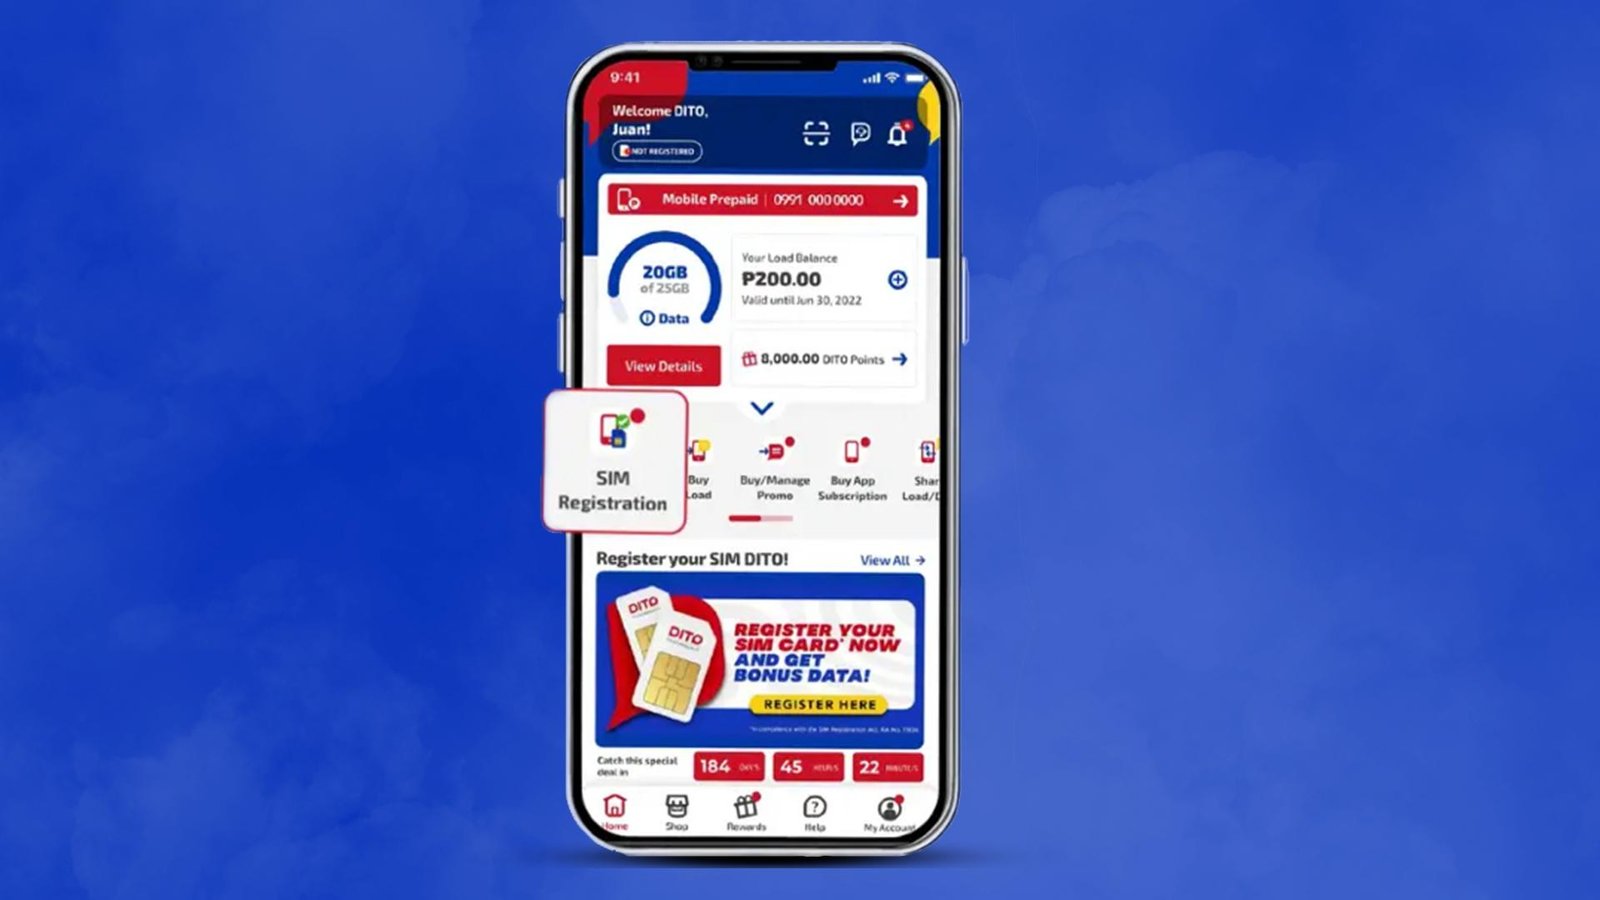
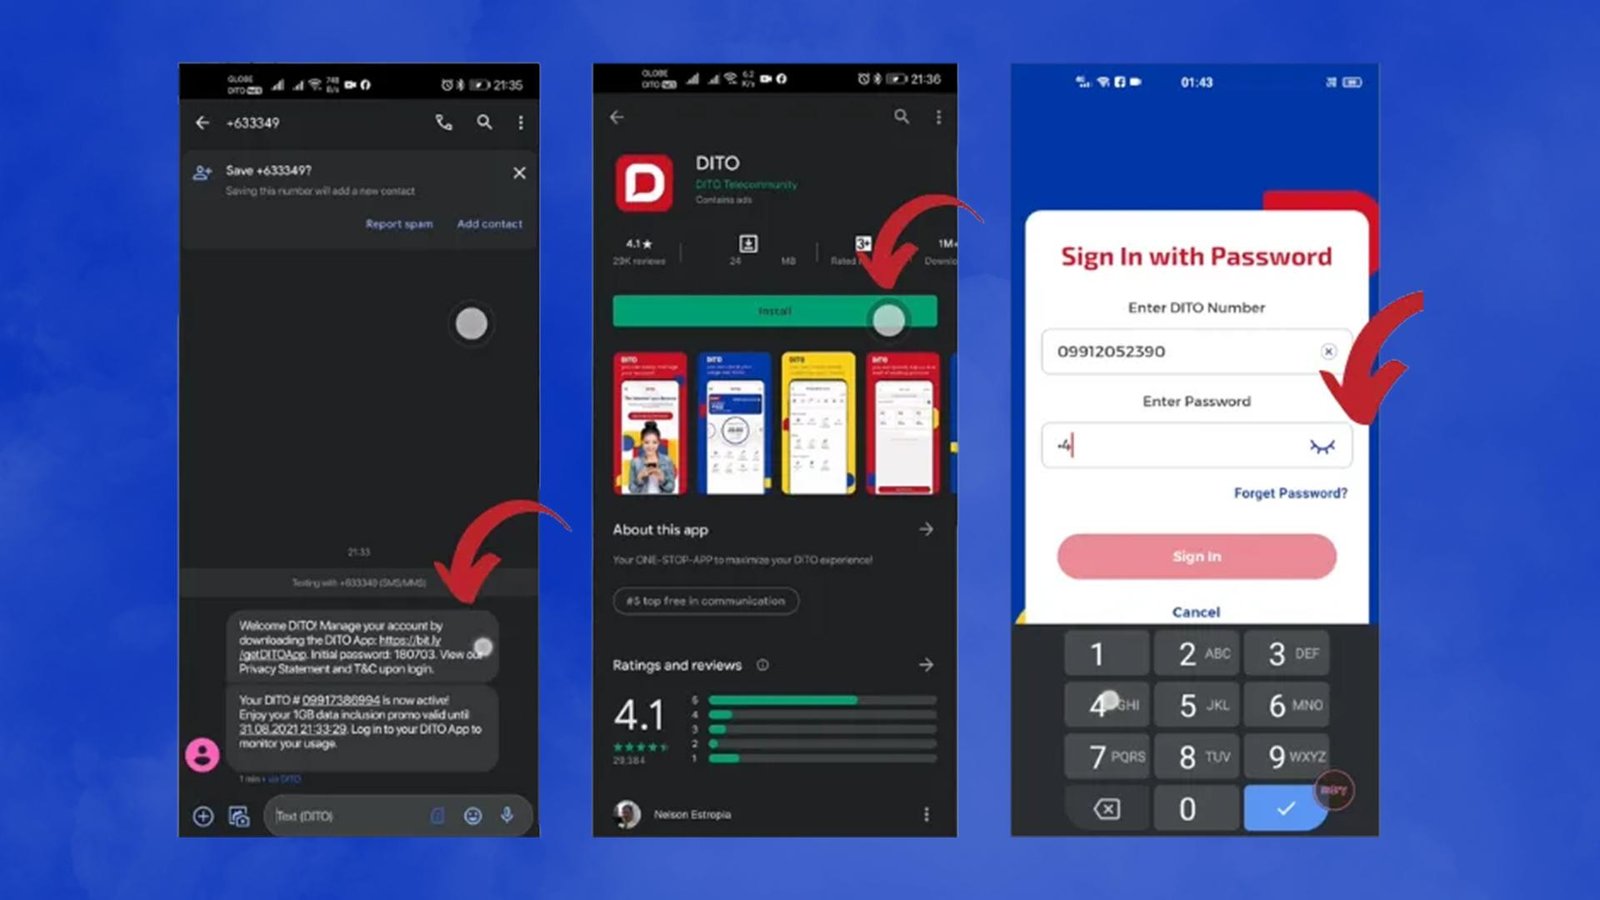
- Go to your device’s Play Store or App Store, download the DITO app.
- After installing the DITO app, open it and log in with your username and password.
- Click on the “Register Your SIM”.
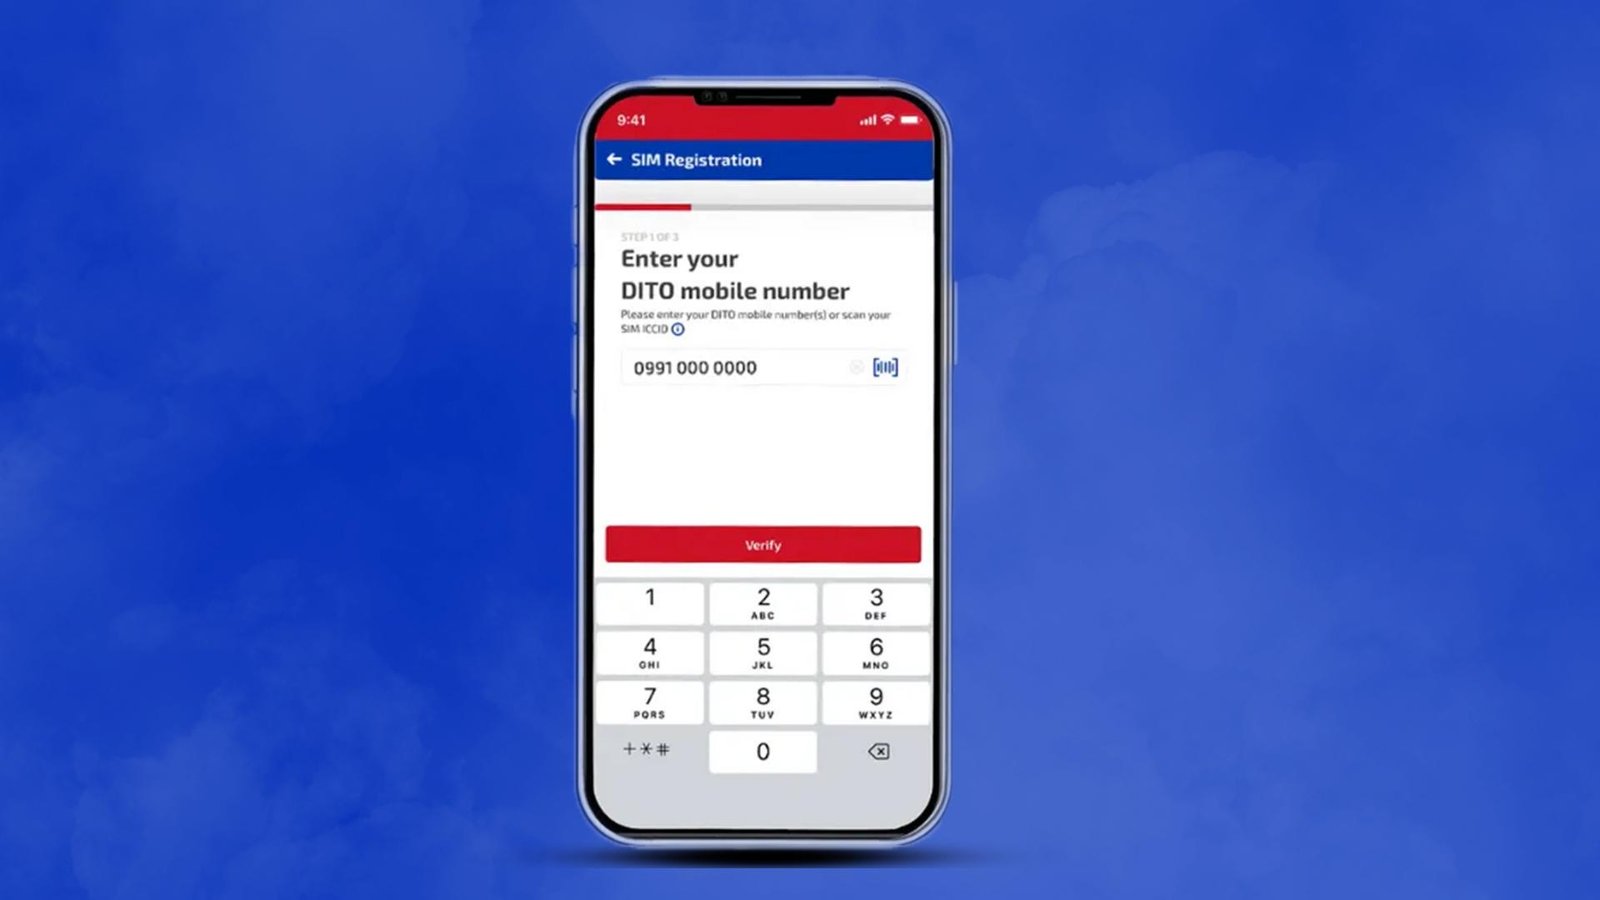
- Now tap ‘Type of Registrant.’ You will find options like Filipino, Filipino Dependent, Foreign Tourist, Foreign National with Visa etc.
- Enter your DITO mobile number or scan your SIM ICCID by tapping the icon, then click ‘Verify’. A one-time PIN (OTP) will be sent via SMS — enter it in the verification code field to continue.
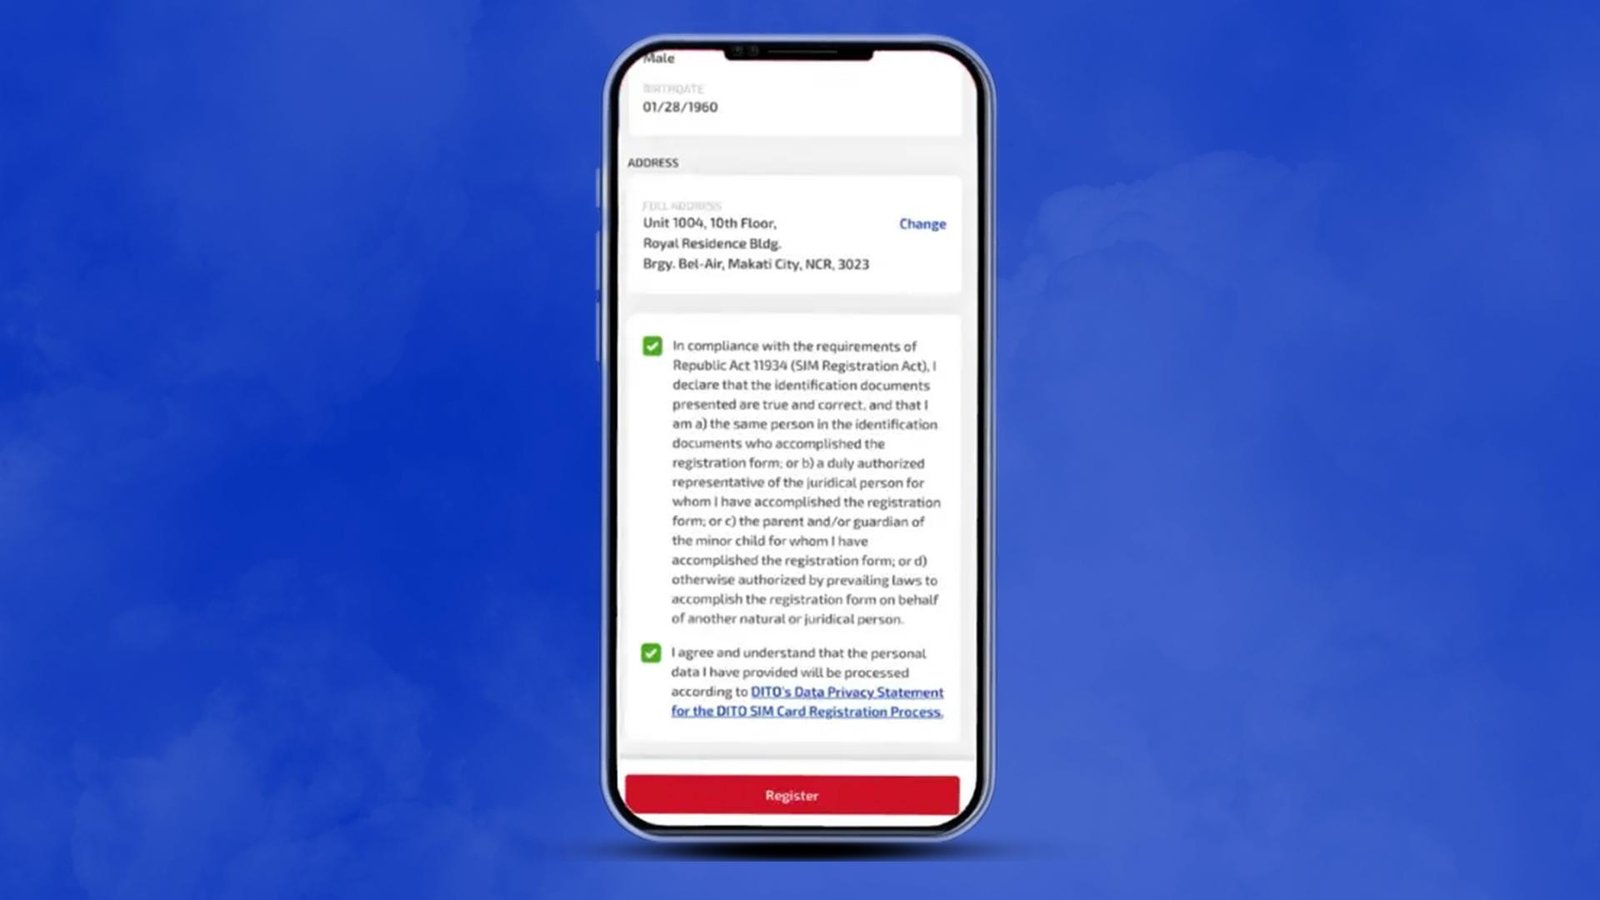
- Fill in your details (name, birthdate, address, etc.).
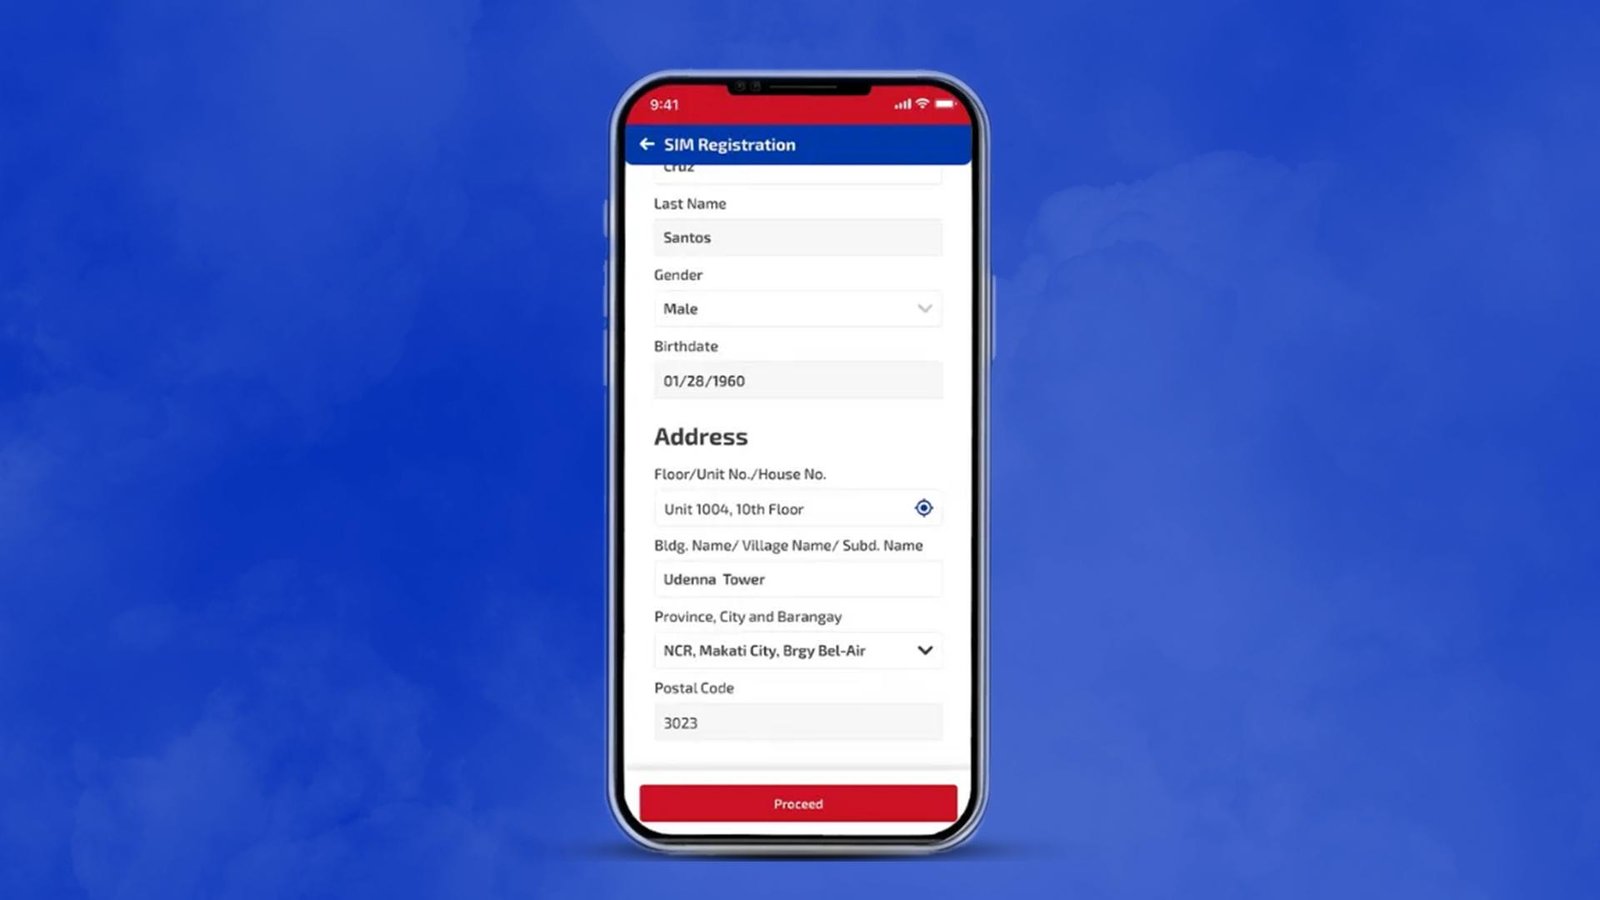
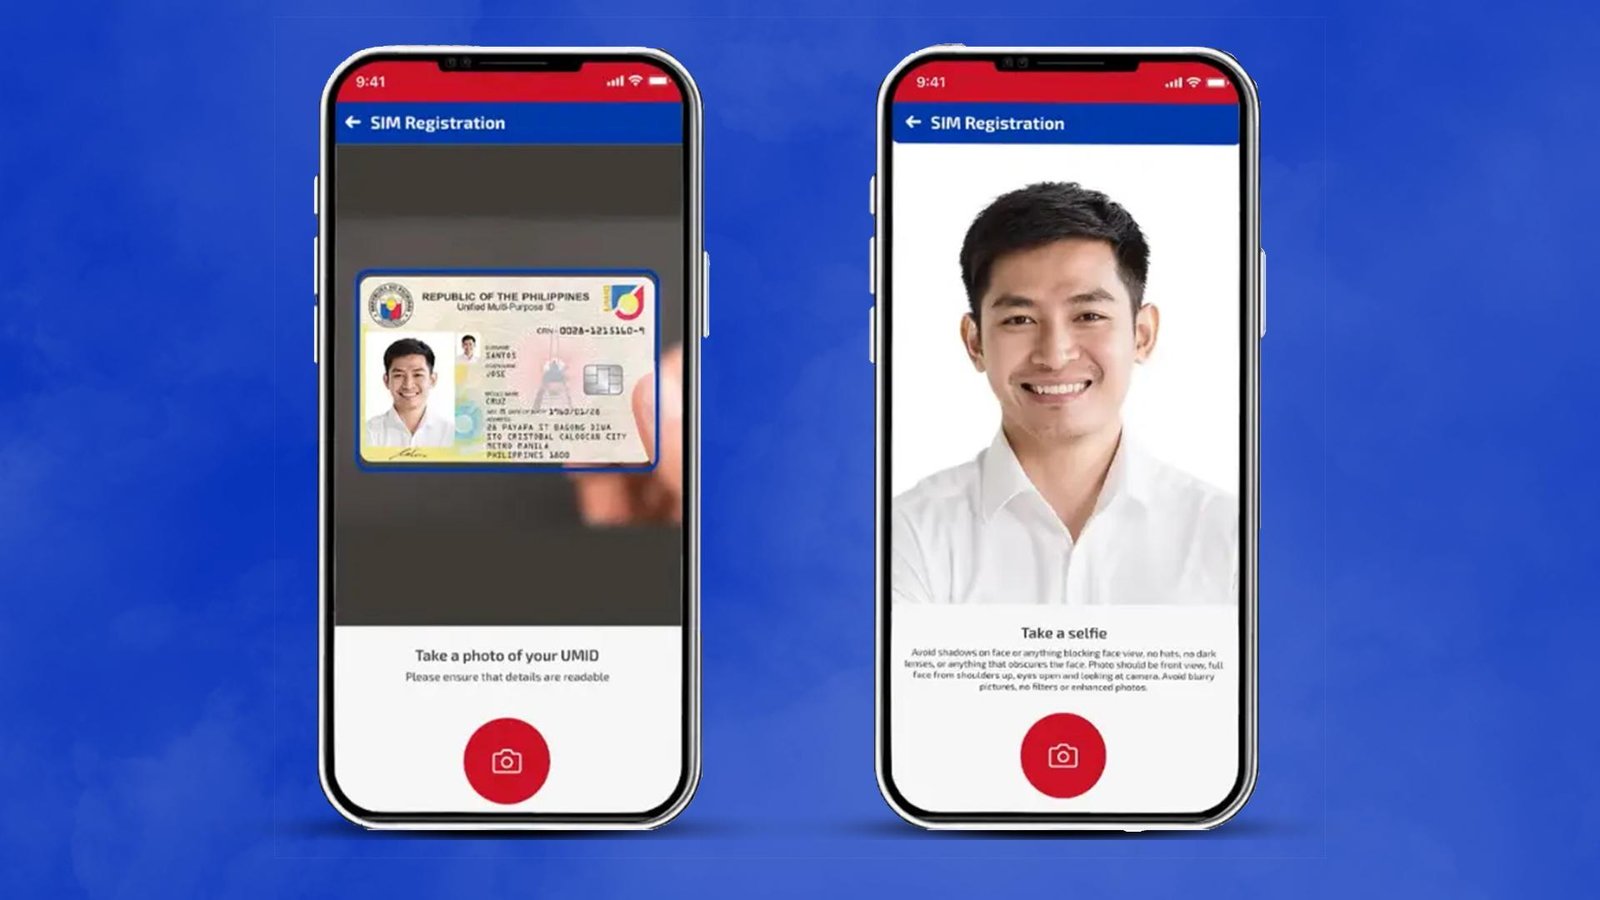
- Upload a valid government-issued ID and a selfie.
- Submit the form, and you’re done!
You’ll get a confirmation with a reference number. Keep it safe for future use.
DITO SIM Registration via SMS
If you prefer to register your Dito Sim Registration without the app, you can easily do it via SMS.
Follow these simple steps:
- Text “REGISTER” to 1850.
- You’ll receive a confirmation message asking for your details (name, birthdate, address).
- Reply with your information, following the format specified in the message.
- Upload a clear photo of a valid ID and a selfie when prompted.
- After submitting, you’ll get a confirmation SMS along with your reference number.
That’s it! Your SIM is now registered.
DITO SIM Registration Link
If you’re not using the app, you can still register your DITO SIM REGISTRATION through a direct web link provided by DITO.
Here’s how:
Visit the official DITO Sim registration page:
Once there:
- Enter your DITO number and verify it with the OTP sent to your phone.
- Fill in your details.
- Upload a valid ID and a selfie.
- Review everything and click Submit.
After successful registration, you’ll receive a confirmation message and your reference number.
DITO SIM Registration for Minors
If a minor (someone under 18) wants to register a DITO SIM, the process is slightly different. Since minors can’t legally register their own SIM cards, a parent or legal guardian must do it for them.
Steps:
- The parent or guardian must register the SIM card on behalf of the minor.
- Provide the minor’s full name, birthdate, and other personal information.
- Upload a valid ID of the minor’s parent or guardian.
- A selfie of the guardian may also be required for identity verification.
- Once submitted, the SIM registration will be processed, and a confirmation message will be sent.
Make sure the parent/guardian is available to handle the registration to avoid any issues.
How to Activate DITO SIM (3 Easy Steps)
Just got your new DITO SIM? Activating it is super simple. Here are the 3 quick steps to get started:
1. Insert the SIM into Your Phone
Place the DITO SIM REGISTRATION into your phone’s SIM slot. Make sure your phone is unlocked and compatible with DITO’s 4G/5G network.
2. Connect to the DITO Network
Turn on mobile data. Your phone should automatically detect and connect to the DITO network. You might receive a welcome text message.
3. Register Your SIM
Open the DITO app or go to register.dito.ph to complete the SIM registration process. After that, your SIM will be fully activated.
That’s it — you’re ready to call, text, and use mobile data!
DITO SIM Registration Tutorial
DITO SIM Registration Problem
Facing issues while registering your DITO SIM? Don’t worry — here are some common problems and how to fix them:
Common Issues:
- OTP Not Received
Make sure your phone has a signal and is connected to the DITO network. Try restarting your phone and requesting the OTP again. - Invalid or Blurry ID
Ensure your ID is valid, not expired, and visible. Avoid shadows or glare when taking a photo. - Selfie Not Accepted
Take the selfie in good lighting, face the camera directly, and don’t wear a mask or glasses. - “SIM Already Registered” Error
This means your SIM might already be registered. Contact DITO support to verify.
Quick Fixes:
- Use the DITO app instead of a browser if one method fails.
- Try a different phone if the SIM isn’t being detected.
- Clear app cache or reinstall the app.
If problems continue, contact DITO customer support via the app or their hotline: 185 (using a DITO number)
DITO SIM Registration App Download
To DITO SIM REGISTRATION, you’ll need the official DITO app, available for both Android and iOS devices.
Download Links:
Android (Google Play Store):
Open the Google Play Store, search for “DITO App“, and install the app developed by DITO Telecommunity.
iOS (Apple App Store):
Go to the App Store, search for “DITO“, and download the app provided by DITO Telecommunity.
Key Features:
- DITO SIM Registration: Register up to 5 SIM cards directly through the app.
- Auto-Fill Forms: Take a photo of your valid ID, and the app will automatically fill out the registration form.
- Account Management: Check your balance, monitor data usage, and manage your DITO account with ease.
- Top-Up Options: Reload your account using various payment methods, including debit/credit cards and popular e-wallets like GCash, GrabPay, Maya, ShopeePay, and WeChat Pay.
- Exclusive Promos: Access app-only deals and promotions tailored for DITO users.
Ensure your device meets the app requirements and has a stable internet connection for a smooth registration process.
Registration Failed to Upload Photos
If you’re having trouble uploading your ID or selfie during the DITO SIM REGISTRATION, you’re not alone. This is a common issue, but it’s usually easy to fix.
Why This Happens:
- Poor or unstable internet connection
- The file size is too large
- Unsupported file format (should be JPEG or PNG)
- App or browser glitch
How to Fix It:
- Check Your Internet Connection Make sure you have a strong, stable data or Wi-Fi connection.
- Reduce Photo Size
Resize your image to be under 5 MB. Most phones do this automatically, but double-check. - Use Supported Formats
Save your photos as .JPG, .JPEG, or .PNG. - Try Another Method
If the app isn’t working, use the browser link:
https://register.dito.ph - Restart or Reinstall App
Clear the cache or uninstall and reinstall the DITO app to remove any glitches. - Use a Different Device
Sometimes switching phones helps, especially if your camera or app isn’t behaving properly.
If none of these steps work, contact DITO customer support via the app or call 📞 185 for direct assistance.
Requirements for DITO SIM Registration
To DITO SIM REGISTRATION, you’ll need to provide specific information and documents based on your user category. Below is a detailed guide:
General Requirements for All Users
- Full Name
- Date of Birth
- Gender
- Present/Official Address
- Valid Government-Issued ID
- Selfie Photo
Accepted Government-Issued IDs
You can use any of the following valid IDs:
- Passport
- Philippine Identification System (PhilSys) ID
- Social Security System (SSS) ID
- Government Service Insurance System (GSIS) e-Card
- Driver’s License
- National Bureau of Investigation (NBI) Clearance
- Police Clearance
- Firearms License to Own and Possess ID
- Professional Regulation Commission (PRC) ID
- Integrated Bar of the Philippines (IBP) ID
- Overseas Workers Welfare Administration (OWWA) ID
- Bureau of Internal Revenue (BIR) ID
- Voter’s ID
- Senior Citizen Card
- Unified Multi-Purpose ID (UMID)
- Persons with Disabilities (PWD) Card
- Other valid government-issued IDs with a photo
For Minors
- SIM must be registered under the parent’s or legal guardian’s name
- Government-issued ID of the parent or guardian
- Consent from the parent or guardian to register the SIM
For Businesses and Corporate Entities
- Certificate of Registration from the SEC or the DTI
- Board Resolution designating the authorized representative or a Special Power of Attorney (SPA)
For Foreign Nationals
Tourists:
- Passport
- Proof of Address in the Philippines
- Return Ticket to home country showing date/time of departure
Foreign Nationals with Non-Tourist Visas:
- Passport
- Proof of Address in the Philippines
- Additional documents such as:
- Alien Employment Permit issued by the Department of Labor and Employment (DOLE)
- Alien Certificate of Registration Identification Card (ACRI Card) issued by the Bureau of Immigration (BI)
- School Registration and ID for students
- For Persons of Concern (POCs), a travel or admission document validly issued by the Department of Justice.
Ensure all documents are clear and legible to avoid any issues during the registration process.
List of Government IDs for DITO SIM Registration
To DITO SIM REGISTRATION, you must provide a valid government-issued ID. As of January 2025, DITO Telecommunity accepts the following IDs for SIM registration:
Primary Government-Issued IDs:
- Passport
- PhilSys ID (National ID)
- Social Security System (SSS) ID
- Government Service Insurance System (GSIS) e-Card
- Driver’s License
- National Bureau of Investigation (NBI) Clearance
- Police Clearance
- Firearms License to Own and Possess ID
- Professional Regulation Commission (PRC) ID
- Integrated Bar of the Philippines (IBP) ID
- Overseas Workers Welfare Administration (OWWA) ID
- Bureau of Internal Revenue (BIR) ID
- Voter’s ID
- Senior Citizen Card
- Unified Multi-Purpose ID (UMID)
- Persons with Disabilities (PWD) Card
- Student ID (for students aged 18 and above)
Additional Accepted IDs:
- PhilHealth ID
- PhilPost ID
- Philippine National Police (PNP) ID
- Armed Forces of the Philippines (AFP) ID
- Municipality ID
- Security Guard License (issued by PNP)
- Fisher Worker Identification Card (issued by the Bureau of Fisheries and Aquatic Resources)
- Local Government Unit (LGU) ID (including Tupad ID under the DOLE ID System)
- Retirement ID (issued by the Philippine Retirement Authority)
- Barangay Tanod ID (issued by DILG or the Barangay itself)
- Health Worker ID
- Agricultural ID (issued by the Department of Agriculture)
- Conductor ID (issued by the Land Transportation Office)
- Maritime ID (issued by the Maritime Industry Authority)
- Navy ID (issued by the Philippine Navy)
- Citizen Armed Force Geographical Unit (CAFGU) ID (issued by the AFP)
Ensure that the ID you provide is valid, not expired, and the photo is clear and legible. Blurry or cropped images may lead to registration errors.
SIM Registration Deadline
Under the Philippines’ SIM Registration Act (Republic Act No. 11934), all mobile subscribers were required to register their SIM cards to enhance security and reduce fraudulent activities.
Final Deadline: July 25, 2023
The National Telecommunications Commission (NTC) set July 25, 2023, as the final deadline for SIM registration. No further extensions were granted beyond this date.
Consequences of Missing the Deadline
Subscribers who failed to register their SIM cards by the deadline faced the following consequences:
- SIM Deactivation: Unregistered SIM cards were deactivated, so they can’t be used for calls, texts, or data services.
- Loss of Services: Deactivated SIMs could not access any mobile services until properly registered.
Grace Period
After deactivation, a 5-day grace period was provided for users to register their SIMs and restore services.
For New Subscribers
New DITO subscribers must register their SIM cards immediately upon activation to ensure uninterrupted service.
DITO SIM Registration Promo
To encourage SIM registration, DITO Telecommunity has offered various promotions and rewards to subscribers. While some of these promos have concluded, others are ongoing or may be reintroduced in the future. Here’s an overview:
2GB Bonus Data for DITO SIM Registration
Previously, DITO offered a 2GB bonus of data to subscribers who successfully registered their SIM cards. This promotion was available until July 30, 2023. DITO SIM REGISTRATION made after this date no longer receive the bonus data.
DITO Starter Pack with Up to 25GB Bonus Data
New subscribers can avail of the DITO Starter Pack for only ₱39, which includes:
- 3GB all-access data upon SIM activation
- An additional 3GB of 5G data for users in 5 G-covered areas
- 4GB bonus data upon downloading and updating the DITO app profile
- Up to 12GB of additional data through Level-Up Pack subscriptions.
This totals up to 25GB of bonus data.
Bonus Load Promo
Subscribers who purchase a DITO-compatible mobile handset bundled with a FREE DITO Starter Pack from participating retail partners can receive ₱1,000 worth of bonus load. To qualify:
- Download the DITO App
- Activate the FREE DITO Starter Pack
- Complete the SIM registration process while in the store
The bonus load can be used as a ₱50 discount per transaction, valid for up to 20 transactions.
Exclusive DITO x Grab Promo
DITO has partnered with Grab to offer exclusive perks:
- 3GB 5G data valid for 5 days
- 3GB of data upon loading Level-Up Packs
- 2GB of data for first-time access to the DITO App
- 2GB of data upon updating the profile in the DITO App
This promotion is valid until September 25, 2025.
DITO SIM Compatible Phones
To fully enjoy DITO’s high-speed 4G and 5G services, it’s essential to use a compatible device. DITO Telecommunity has tested and approved a wide range of smartphones across various brands. Below is an updated list of DITO-compatible phones as of 2025:
Popular Brands and Models
Brand | Model |
Samsung | Galaxy A Series: A14 5G, A23 5G, A52s 5G, A54 5GGalaxy S Series: S21 5G, S21+ 5G, S21 Ultra 5G, S23Galaxy Z Series: Z Flip 4 |
Huawei | Mate Series: Mate 30 Pro 5G, Mate 40 Pro 5GP Series: P40, P40 Pro |
Oppo | A Series: A78 5GReno Series: Reno 8 5G, Reno 8 Z 5G, Reno 7 5G, Reno 7 Z |
Realme | 9 Series: realme 9 Pro, realme 9 Pro+10 Series: realme 10 Pro+ 5G, realme 10 Pro 5G11 Series: realme 11 Pro 5G, realme 11 Pro+ 5G |
Xiaomi | 11 Series: Xiaomi 11 Lite 5G NE, Xiaomi 11T, Xiaomi 11T Pro12 Series: Xiaomi 12, Xiaomi 12 LiteRedmi Series: Redmi 10 5G, Redmi 12 5G |
Vivo | Y Series: Y36 5GV Series: V27 5G |
Infinix | Note Series: Note 30 Pro 5G |
POCO | F Series: F4, F4 GT, F5, F5 ProM Series: M4 Pro 5GX Series: X5 Pro 5G, X4 GT |
Narzo | narzo 50 5G, narzo 50 Pro 5G |
ZTE | Blade Series: V41 Vita 5GA Series: A73 5G |
Nubia | Red Magic Series: Red Magic 8 Pro |
Cherry Mobile | Aqua Series: Aqua S9, Aqua S10 ProFlare Series: Flare S8, Flare S8 Lite, Flare S8 Max, Flare Y20, Flare Y5 |
MyPhone | X Series: MyX12, MyXI1 Plus, MyXI1 Pro, MyXI3WX Series: MyWX1 Plus, MyWX2, MyWX2 Pro |
Pixel Series: Pixel 6, Pixel 6 Pro, Pixel 6a, Pixel 7, Pixel 7 Pro, Pixel 7a, Pixel 8, Pixel 8 Pro | |
Honor | 90 Series: Honor 90, Honor 90 LiteX Series: Honor X6a, Honor X9a 5G |
TCL | TCL 1 SE, TCL 10 Plus, TCL 10 5G, TCL 20 SE, TCL Plex |
Itel | Vision Series: Vision 2, Vision 2 Plus |
Nokia | G Series: G10, G50, G60 |
How to Check Compatibility
To verify if your device is compatible with DITO:
- Check the Official List: Visit DITO’s official website for the most recent list of compatible devices.
- Test Your SIM: Insert a DITO SIM into your phone and see if it connects to the network.
- Configure APN Settings: If necessary, adjust your phone’s Access Point Name (APN) settings to match DITO’s requirements.
- Contact Support: If you’re unsure about compatibility, reach out to DITO customer support for assistance.
For a comprehensive and updated list of DITO-compatible phones, visit: https://dito.ph/compatible-handsets
DITO SIM Registration Rewards
DITO SIM REGISTRATION unlocks a variety of rewards and benefits designed to enhance your mobile experience. From bonus data to loyalty points and exclusive promos, here’s what you can look forward to:
2GB Bonus Data
Upon successful DITO SIM REGISTRATION, you receive 2GB of bonus data. This complimentary data is perfect for browsing, streaming, or staying connected with friends and family. The bonus is typically credited to your account within 24 to 48 hours after registration.
Loyalty Rewards Program
DITO offers a loyalty program where you can earn points through various activities:
Top-Up Rewards:
- Earn 3% of your top-up amount in points when recharging via the DITO App or MyDITO.
- Earn 1% when recharging through other channels.
Promo Purchases:
- When purchasing promos using payment partners like GCash, GrabPay, Maya, WeChat Pay, or credit/debit cards, you earn points.
- For example, buying the DITO 199 promo via the DITO App yields 5.97 points, whereas using other channels yields 1.99 points.
Redeeming and Sharing Points
Accumulated points can be redeemed for various rewards:
- Redeem: Use points for data packages, dining vouchers, and more through the DITO App.
- Share: Transfer points to other DITO users via the app by entering their mobile number and the amount to share
Ensure you have the latest version of the DITO App to access these features.
Exclusive Starter Pack Offer
New subscribers can avail of the DITO Starter Pack for just ₱39, which includes:
- 3GB all-access data upon activation.
- An additional 3GB 5G data for users in 5G-covered areas.
- 4GB bonus data upon downloading and updating the DITO App profile.
- Up to 12GB of additional data through Level-Up Pack subscriptions.
This totals up to 25GB of bonus data.
Bonus Load Promo
Subscribers who purchase a DITO-compatible mobile handset bundled with a FREE DITO Starter Pack from participating retail partners can receive ₱1,000 worth of bonus load. To qualify:
- Download the DITO App.
- Activate the FREE DITO Starter Pack.
- Complete the SIM registration process while in the store.
The bonus load can be used as a ₱50 discount per transaction, valid for up to 20 transactions.
Referral Program
Earn up to 10GB of data and additional DITO points by inviting friends to join DITO:
- Open the DITO App and locate your referral code.
- Share the code with friends and family.
- When they activate their DITO SIM REGISTRATION and subscribe to a promo using your code, you receive the rewards.
By DITO SIM REGISTRATION, you not only comply with regulatory requirements but also unlock a suite of rewards designed to enhance your mobile experience.
Troubleshooting Common Issues
Despite DITO’s user-friendly registration process, users might occasionally face hiccups during SIM registration. Here are some common issues and how to fix them quickly:
1. Registration Failed to Upload Photos
Problem: You’re unable to upload your valid ID or selfie during registration.
Solution:
- Make sure the ID is clear, readable, and taken in a well-lit environment.
- Avoid using old or damaged IDs.
- Try compressing your image to reduce the file size if you’re using mobile data.
- Switch to a stable Wi-Fi connection and try again.
2. DITO App Not Responding or Crashing
Problem: The app freezes, crashes, or won’t open.
Solution:
- Update the DITO App to the latest version from the Google Play Store or Apple App Store.
- Clear the app cache (Android users: Settings > Apps > DITO > Storage > Clear Cache).
- Reboot your phone and try again.
3. Unable to Access SIM Registration Link
Problem: The link to the registration page doesn’t open.
Solution:
- Double-check the URL: https://register.dito.ph
- Try opening the link in a different browser or device.
- Disable ad-blockers or VPNs that might be interfering with the site.
4. “SIM Already Registered” Error
Problem: You see a message saying your SIM is already registered, but you haven’t done it.
Solution:
- This could mean the retailer pre-registered the SIM. Contact DITO customer support at 185 or through the DITO App’s chat function for verification and correction.
5. No Signal After Registration
Problem: Even after registration, you’re not getting a signal.
Solution:
- Make sure your phone is DITO-compatible.
- Restart your phone after inserting the SIM.
- Set your device to 4G/5G preferred mode.
- If the issue persists, contact DITO support.
6. Verification SMS or Email Delayed
Problem: You didn’t receive a confirmation message.
Solution:
- Check your spam/junk folder (for emails).
- Wait a few minutes — delays can happen during peak hours.
- If it takes more than 24 hours, repeat the registration process or contact support.
By addressing these common problems early, you can ensure a smooth and hassle-free SIM registration experience. Always keep your details accurate and your documents ready before starting the process.
DITO SIM Registration Fill-Up Form
To complete your DITO SIM registration, you’ll need to fill out a digital form either through the DITO App or via the official registration link. Here’s a quick overview of what the form includes and how to fill it out correctly.
Step-by-Step: What You’ll Need to Enter
1. Mobile Number
- Enter your active DITO mobile number (starting with 0991, 0992, etc.).
- A one-time password (OTP) will be sent to verify your number.
2. Full Name
- Input your First Name, Middle Name, and Last Name exactly as shown on your government ID.
3. Date of Birth
- Format: MM/DD/YYYY
- Must be 18+ years old (Minors will require a guardian’s ID).
4. Sex
- Choose between Male, Female, or Prefer not to say.
5. Nationality
- Most users will select “Filipino”. Foreign nationals must upload additional documents.
6. Government-Issued ID
- Select the ID type from a dropdown list (e.g., UMID, Passport, Driver’s License).
- Upload a clear photo of the ID (front only).
- Ensure all details are visible and not blurry.
7. Selfie Verification
- Upload a selfie holding the same ID you submitted.
- Ensure your face is visible and matches the ID.
8. Home Address
- Include: House/Unit number, Street name, Barangay, City/Municipality, Province, and ZIP code.
9. Email Address (Optional but Recommended)
Used for account recovery and receiving updates/promos.
Tips to Avoid Errors
- Use bright lighting and a clean background for your ID and selfie.
- Avoid typos—double-check your name and birth date.
- Make sure images are not larger than 5MB.
Once all fields are filled, click “Submit” and wait for confirmation. You’ll receive an SMS once your registration is successful. If you don’t, double-check your email or retry the process.
DITO SIM Registration Load
Wondering if you need a load balancer to register your DITO SIM? Here’s what you need to know:
Do You Need a Load to Register a DITO SIM?
No, you don’t need any load or balance to register your DITO SIM. The registration process is completely free, whether you do it via the DITO App or the online registration portal.
What You Can Do After Registration
While load is not required for registration, you might want to top-up your DITO SIM right after registration to:
- Activate promos (like welcome data or starter plans)
- Make calls or send SMS
- Use mobile data if your free data is used up
How to Load Your DITO SIM
You can buy a load through:
- DITO App (via debit/credit card or GCash/PayMaya)
- DITO Retailers or Stores
- Third-party apps like GCash, Shopee, or Lazada
Bonus: Registration Promo Load
After registration, many users receive bonus data (e.g., 2GB) without having to buy a load. Keep an eye on the DITO App or check your SMS for promo details.
In short, no load is required to register, but adding load afterward lets you maximize your DITO SIM experience.
DITO SIM Registration Unli Data
One of the most exciting perks for new DITO users is the chance to enjoy unlimited data promos right after registration. While registration itself doesn’t automatically activate unlimited data, it does unlock access to exclusive unli data offers.
Does SIM Registration Come with Unli Data?
Not directly. However, once you register your DITO SIM, you can:
- Access app-exclusive unlimited data promos
- Get notified about limited-time “UNLI” offers via SMS or app
- Use welcome data bonuses that can be topped up with unli promos
Unli Data Offers After Registration
Here are some of the popular DITO unlimited data promos available post-registration:
Promo Name | Price | Validity | Description |
UNLI 5G | ₱199+ | 7 days | Unlimited 5G data (with FUP*) |
UNLI DATA 99 | ₱99 | 1 day | Unlimited data for 24 hours |
UNLI DATA 299 | ₱299 | 30 days | Unlimited 4G/5G data (selected users) |
*FUP = Fair Usage Policy may apply after a certain limit (e.g., 50GB/day)
How to Avail Unli Data Promos
Register your SIM via the DITO app or website
- Open the DITO App
- Go to “Buy Promo” or “Data Offers.”
- Choose the Unli Data Promo you want
- Tap Buy Now and complete payment
Pro Tip:
Make sure your phone is 5G-ready and DITO-compatible to fully enjoy the speed and performance of unli data promos.
Frequently Asked Questions (FAQs)
Here are some of the most commonly asked questions about DITO SIM registration—all answered in a simple, user-friendly way.
Conclusion
Registering your DITO SIM is not just a legal requirement—it’s also your gateway to a faster, more secure, and promo-packed mobile experience. Whether you’re doing it via app, SMS, or online form, the process is straightforward and user-friendly.
By completing your registration:
- You secure your mobile number
- You unlock exclusive offers like unli data, welcome promos, and rewards
- You protect yourself from SIM-related fraud and identity theft
So don’t delay—register your DITO SIM today and start enjoying the full benefits of being a DITO subscriber. If you run into any issues, refer to the FAQ section or contact DITO’s customer support for help.
All content published on DITO SIM Registration Guide is for informational and educational purposes only. This site is not affiliated with DITO Telecommunity. Always verify with the official website for the latest updates.